Our lot is next to one of the the public boat launches for our lake. In the very first picture in this blog - that was taken from the launch, near the lake.
Anyhow, it turns out that that gravel path is platted as a town road. Therefore, according to the county code, we need to be 75' from the centerline of that "road". Taking both side setbacks into account and estimating the width of the lot at that point, that would mean that the house could not be more than 20' or so wide. . . . .
The existing structure is located within that zone, but there is no "grandfathering". We need to apply for a variance which will most likely be granted without any dispute, however, the next variance meeting is not until 5/18.
We were really looking forward to starting soon - oh well, hurry up and wait. . . .
An online journal covering the preparation and construction of our new home. Older Posts can be accessed using the Archive links.
Friday, April 21, 2006
Wednesday, April 12, 2006
Second Floor

The roof over the master suite is not shown, nor is the bonus room over the garage. This only shows the 2nd floor living space.
The door on the stair landing is for the bonus room. The loft area delineates the kitchen below.
More messing around in MSPaint to roughly modify the jack-and-jill bathroom layout. Since I increased the size of the bath and HVAC chase, I will need to shrink the BR closets just a bit. Whatever happens, they will be sized to accept some standard size bi-fold doors.
The BR bumpouts are cantilevered over the front porch (scroll down to see elevations)
Floor Plans - First Floor

Here is a shot of the first floor layout.
The "Master Suite" runs front to back along the south wall of the house. We have not finalized the layout of the closets in the master BR, nor the exact master bath layout. You will notice that I once again was plaing around in MSPaint with some options.
Also missing from this layout is the garage. When I cut the graphic from the scanned PDF, I left that off.
As part of our goal for an "efficient but not boring" design; note that the building only has 4 corners. The garage walls, if they were there simply follow the line of the front and back of the house. The garage is "2 wide and 2 deep", but the corner of the garage near the door in the stair area will be converted to a mudroom.
Some other comments - The powder room shown between the office and foyer area. That strange "other toilet" drawn in is going to be a urinal (the wife is very understanding, don't you think). The enclosed area behind that is an HVAC and plumbing chase. I want to have 2 large return air ducts at the high point in that greatroom and this will be the path they take.
I suppose if anyone wants to see the actual entire plan set (foundation and both floors) please let me know and I will post them.
Thursday, April 06, 2006
Better Garage Picture
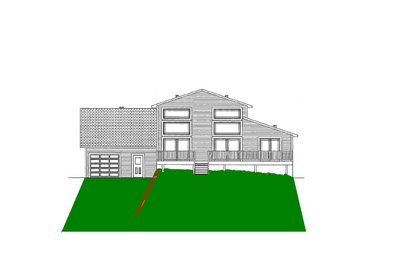
South Elevation

This elevation shows the clerestory windows for the greatroom, as well as a couple in one of the upstairs BR's. The 4 long windows are in the master BR and bath. And, obviously, the bottom 3 windows are to allow light into the basement.
You will see in the next post that this view is meant to relate to the southern elevation of the garage. The clerestory windows work with the soffit overhang to allow direct sunlight (passive solar heating) in the Winter when the sun is low, but indirect light only in the summer.
North Elevation
Rear (Lake Side) Elevation

The rear facing garage door is to make it easy to get things like lawn furniture, kayaks, etc, out to the lake. You will be able to see on the North Elevation that the garage extends from the front of the house to the rear.
The gap between the 8' sliding glass doors will (someday) have a chimney instead for an outdoor fireplace. Provisions are being made with the footings for the same purpose.
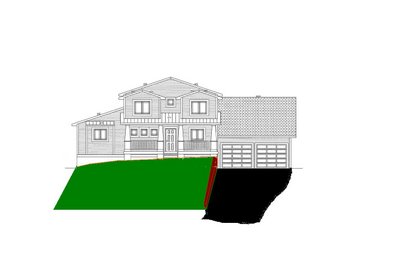
Front (Street Side) Elevation

I am having a hard time posting some decent pics of the plans. So far, this is the best I have been able to do. (If anyone reading this knows a better way to post or attach PDFs, please let me know. I made this work by copying the image from the PDF into MS Paint and then saving that as a JPG. . . )
We are considering a small gable in the center of the porch roof witha small "timber frame style" visible truss.
Since I had this in MSPaint, I made a feeble attempt to show how a retaining wall and how the grade will slop away from right to left.
Tuesday, April 04, 2006
Some Background

The wife and I bought an old vacation cottage about 5 years ago. It is on a lake in Wisconsin. This is our primary residence and the plan had always been to knock it down and build a new house as soon as possible.
Along the way, we built a 3-car garage on site with an upper level "apartment" we will live in during construction. When we are done, we hope to use that area as a guest house for visitors. As the old saying goes, "Guests, like fish, start to smell after three days." Giving our guest their own place to stay will make an extended visit more pleasant for everyone. . .
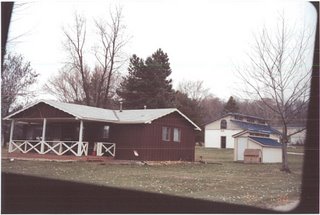
The picture shows the place as it pretty much is today - in all of its 720 square feet of glory. (The odd frame around the picture was caused by a broken part floating around inside my mom's camera) You can also see in the picture the shed we built as a prototype for the look we were going for on the garage.
Future posts will cover the path to this point, more info on the garage, and our progress as we move ahead. With any luck, the volunteer fire department will be setting this place ablaze within the month!
Subscribe to:
Comments (Atom)

